I wanted a turntable to show off some prints, and after looking all-around the web i falled into amazings Bribro12’s Fully 3d-printable turntable and Arduino controlled photogrammetry 3D-scanner designs.
I liked a lot the gear/bearing system but i wanted to change a bit the aesthetics and electronic components, so i decided to modify the “enclosure” or “base” to fit my needs.
Actual capabilities
Supports a series of accelerated and constant moves. Also can be set to spin indefinitevely in one or other direction at certain speed. You set your desired moves in two ways:
- Using the incorporated web UI
- Using custom http API
Required components
- 1x nodemcu esp8266
- 1x 12V to 5v Buck converter
- 1x 28-byj
- 1x uln2003
- 1x 12V power source
- 1x Female Jack adapter with screw terminals
- 6x Female to female Dupont cables
- 4x M3 screws and nuts
3dprinted components
From original design
- 1 Outer Gear
- 1 Inner Gear
From my mod files
- 1 BasePlate
- 1 Top platform from your election
Build Guide
Schematics
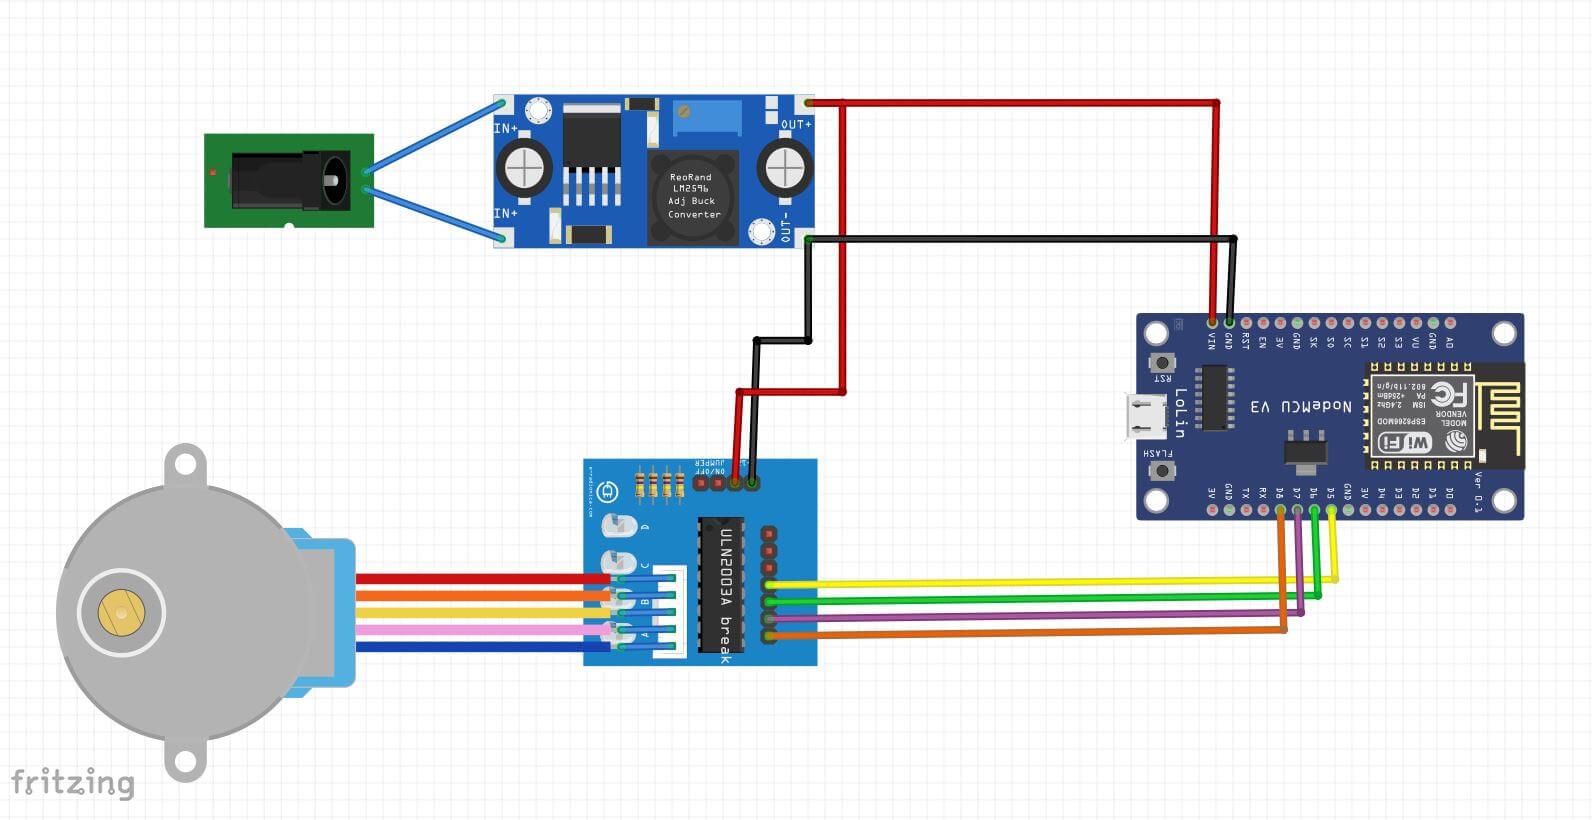
Initial Electronics connections
To prepare for the build, first you need to: - Solder cables to 12v buck converter input. - Cut two dupont cables, and solder both ends of the resulting cables to each of the of the buck converter outputs.
Component placement
- Screw to the base:
- nodeMcu module
- the stepper motor
- The female jack power adapter
- Once everything in place, connect the stepper driver, as described in the schematics:
- to the motor
- to the nodemcu
- finally put the motor driver in place
- If everything fits in place, it’s the moment to place the buck converter, for this:
- Connect the power outputs to the motor driver and esp8266
- Screw the power input cables into de female Jack power input terminals
Firmware setup
The full code of the program is available under the following Github Repo
You will need to:
- Download the code
- Open it in PlatformIO as a project
- Configure the settings if needed in the src/config.h file
- You can set up the Wi-Fi credentials, the number of turns needed for a full turn, and the stepper motor pin config
- Upload the code
- Upload the File System Image
- You can find it in platformIO under “Project Tasks”
How to use
Web UI
In this moment the interface is divided mainly in two parts:
- List of movements
- You can find three buttons under the text, from left to right:
- Add: Adds a new movement to the list
- Clear: Clears the movement list
- Start: Starts the series of movements
- For each moment you need to set:
- Position: Set degrees desired to move, negative moves counterclockwise
- Speed: Speed to make the move at
- Acceleration: Acceleration and decelaration of the movement, set to 0 to make a constant speed move
- You can find three buttons under the text, from left to right:
- Set indef movement at speed
- You can find the controls in the next white tab.
- In this mode, you only need to set the speed, and click on ones of the arrows in the button zone.
- You also have a stop button where you can stop the move, you can change the speed on the go, withouth needing to stop. This stop button works also if you had set a list of moves in the other mode.
You can test and edit the web UI under the following CodePen, but be advised that as the project is in development, sometimes it’s not fully updated.
API
Currently supports the following http GET requests:
- Infinite movement: /infinite?speed=X
- Params:
- Speed: if positive, moves clockwise, if negative, moves counterclockwise
- Params:
- Stop: /stop
- Stops any movement and free queue of movements
- Multiple moves: /multi?
- Types of moves:
- Constant: cons=pos;speed
- Accelerated: accel=pos;speed;accel
- Params:
- pos: Distance to move, in degrees, negative means counterclockwise moves.
- speed: Max speed in the move
- accel: Acceleration of the move
- Types of moves:
Acknowledgments
- First and foremost, i wan’t to express my gratitude to Thingiverse user Bribro12, designer of the Fully 3d-printable turntable for sharing his design and Fusion files so i could remix it.
- All the open source developers that creating the following amazing libraries and sketchs and/or collaborated in any way, specially in the following projects:
- All the creators of the following tutorials, which shared the knowledge to make the software possible to be made, or at least in less time.